Contact Us
Mount Cutting Multiple Aperture Mounts
This page provides a summary of how best to use the mount cutter that I recommend. It also forms a summary of the instructions that I have written to go with the mount cutter. The instructions for the mount cutter are made up of 12 pages of A4 and utilise a step-by-step approach. There are also useful diagrams throughout so guide you along the way. The mount cutter used here is a Jakar mount cutter and can be purchased through this website. Please visit our Shop for further details.
Useful Tips for Mount Cutting
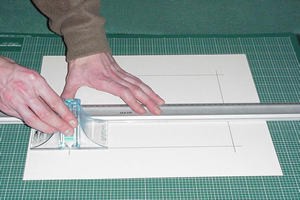
Make sure the mount cutter is this way round
- Make sure that the mount cutter runs up and down the straight edge groove smoothly.
- Check that the blade is sharp.
- Always mark out and cut the mounts from the back of the mountboard.
- Think about it three times, measure it twice and cut it once.
- Ensure that the bevel is going to be the right way.
- Cut the mount on the top of a scrap mountboard or cutting mat.
- Mind your fingers !
- Always use a razor blade to finish any under cutting that may be needed.
- Mind your fingers !
- Never push the middle of the mount out because it will tear the board.
- If at first, you don’t succeed ......!
Exert from book Frames and Framing by Andy Parks
Do not cut deeper as you cut. Once at the stop point, keep the blade at the same depth as you had to begin with and then slide the mount cutter back to the start point. Move the blade slightly deeper. Then repeat the stages as above.
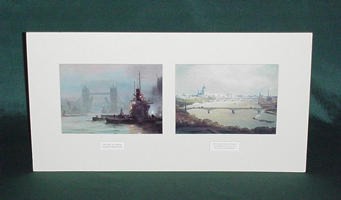
Useful Tips for Multi Aperture Mounts
A Multi Aperature Mount
- Always draw a rough sketch with all dimensions shown
- If you make the border between the apertures smaller that the outside borders,this will look easier on the eye.
- Measure these points carefully and check your addition to avoid mistakes
- Draw the mount on the back of the board as usual
- Circle the points of intersection on the mounts, with a pencil, to make the shape clearer from the other lines.
- Make sure you have the mount cutter pointing the right way before cutting each line.
- Cut one hole at a time and remove the middle with a razor blade.
- For single mounts with one aperture, always have a greater width of mount at the base.
Exert from book Frames and Framing by Andy Parks
When measuring your multiple aperture mounts the bars between the pictures tend to look better if they are a lot narrower than the outer borders of the mount. A good measurement is to use ¾” – 1” or 20mm to 25mm for the bars between pictures. Any wider than this and the pictures can appear to be unrelated to each other.
Frame Cutting and Assembly
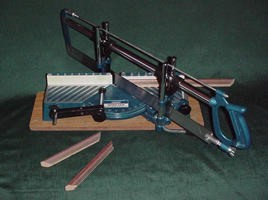
This page provides a summary of how best to use the mitre saw and the mitre vices that I recommend to cut and assemble your frames. The mitre vices can be purchased through this website. Please visit our Shop for further details. The mitre saw used for cutting the frames can be bought at various DIY stores but do send me details of the saw before you buy it as I can advise of the best one to purchase. I also have some very good instructions that I have written for the mitre saw that are available with some of the combination kits.
Useful Tips for Frame Cutting
The mitre saw that is the most cost-effective model. Instructions are available for this model but we do not sell this saw due to the weight of the saw for delivery.
- If buying your own mitre saw, buy the black one NOT the blue one as it has a better clamping system
- A 24 teeth per inch (T.P.I.) blade is recommended as it gives the best cut. Such a blade will cost app. £8.00
- Always allow 1/8” extra length when cutting frames, e.g. if the mount measures 12” X 10” then cut the frame 12 1/8” X 10 1/8”
- Cut all the angles one way first then turn the saw round for the opposite angle
- Cut the long side first, then if any mistakes occur this can then be used for the short side.
- Be careful with the first few strokes of the saw blade so as not to splinter the top edge of the material.
- Don’t let the saw drop onto the top of the moulding
- Make sure the saw will stop before it cuts into the aluminium casting.
- Do not crush the rebate of the moulding with the clamps.
- Measure it twice - cut it once
- Mind your fingers!
Exert from book Frames and Framing by Andy Parks
You will create a lot of saw dust and it will probably hinder the view of the etched line on the mitre saw base. Do not blow this dust as it will invariably go in your eyes. The best idea is to keep the saw dust in a small pot or box and use it as a filler in combination with wood glue.
Useful Tips for Mitre Assembly
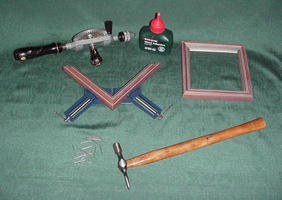
The mitre vice for sale through my classes and the shop
- Use white P.V.A or resin ‘W’ glue
- Use 19 gauge panel pins
- Drilling the holes first will make assembly of the frame easier
- Drill the pilot holes with the same gauge panel pin to be used in assembly. Do not use a drill bit for this
- Protect the moulding in the mitre vice with scraps of mountboard.
- Always join one short length to one long length.
- Make sure each pair of long and short lengths are of the opposite hand, e.g. long length, right hand - short length, left hand.
- Cut heads of nails off with pincers if they are too big and will look unsightly
- Leave the mitre in the vice overnight, once nailed, to allow the glue to dry thoroughly
Exert from book Frames and Framing by Andy Parks
It is recommended that you only use a water based wood adhesive glue, such as PVA or white wood glue. Do not use such glues as instant contact glues or strong industrial spirit based glues. This is because it is quite difficult to perfectly align two pieces of moulding in the mitre vices and you may need to make slight adjustments to ensure a perfectly aligned corner. Also the glue often spills over onto the top of the frame. In fact this seepage is highly desirable to ensure plenty of glue. Any spirit glue may take the surface off your moulding so only use wood glues that are water based.

Decoration & Ovals
Useful Tips for Mount Decoration
Examples of decorated mounts
- Store gold / silver pens for line / bevels horizontally not vertically
- Shake the pens well before use
- Test the pens for consistency on a piece of scrap mountboard before use
- Ensure that the straight edge does not actually touch the mountboard, along the edge where the pen is to be used
- Use a pin or needle to make the start / end finish points for each line
- Do not make these holes too deep
- If straight edge moves, secure it with Blue-Tac
- For water colour lines, test the line colour first on a piece of scrap mountboard, allow to dry and test for suitability. This also applies to water colour wash band.
- Do not buy an expensive artist’s pallet, use a cake tin with nine cake holes to mix your watercolour in
- For water colour wash band start the wash with water only at the start / finish point. In hot weather wash the whole mount with water before using the colour
- Do not make the washes too dark
Exert from book Frames and Framing by Andy Parks
The width of the mount needs to be wide enough to accommodate your mount decoration. Therefore it is probably wise to cut a wider border than you think you will need at first. Then cut down the mount border width after decoration to avoid the mount decoration dominating the picture. It is fairly easy to go over the top with mount decoration so do keep this in mind. Also subtle mount decoration using watercolour will only be visible on lighter coloured mount boards so water colour decoration will look the best on off white coloured mount boards.
Useful Tips For Oval Mounts & Frames
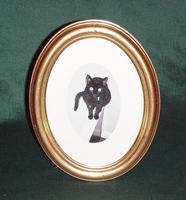
An example of picture framing using an oval mount & frame
For Mounts:
- Make sure the Stanley knife blade is sharp.
- Use Blu-Tac to secure the mount to the cutting matt and the cutting matt to the bench.
- Keep the knife as horizontal as possible NOT VERTICAL as this will keep the knife under control and ensure a clean cut.
- Keep your fingers out of the path of the knife at all times.
- Use a piece of string that does not stretch.
- Oval mounts are easier to cut on thin boards or paper.
- Cut mounts from the back of the board you are using.
For Frames:
- If you are cutting the glass yourself (not recommended) do be very careful of glass splinters and always wear protective glasses.
- When cleaning the glass, be aware of sharper edges on the glass than on straight pieces of glass. They are very, very sharp.
- Take time ensuring that there is an even amount of mount showing around the picture. If you fit it uneven, it will show very badly.
- When fitting the back into the oval frame, try to make the back as close as possible to the top of the frame. This will make papering in a lot easier.
Framing Examples
What can be achieved
These are all pictures that can be framed after completing various lessons from my classes.
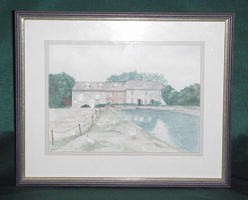
Headley Mill
This watercolour of Headley Mill, Hampshire was framed using a double over mount. These have the advantage of leading the eye into the picture. Also, correctly chosen colours will emphasise certain areas and tone down others. This could be useful if you have a favourite part of a picture or want to bring out a certain colour.
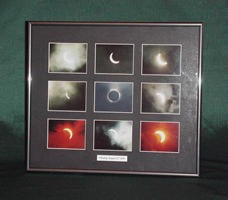
The total solar eclipse, again!
This multiple aperture mount of the eclipse utilises black so that the photographs become even more dramatic with the crisp white bevels. This was a series of photos taken by myself at Fecamp in Northern France during the total solar eclipse of 1999. The photography does not bear up to close inspection but the effect after framing represents the sequence quite well I think. This was a fantastic experience and I thoroughly recommend witnessing it for yourselves!
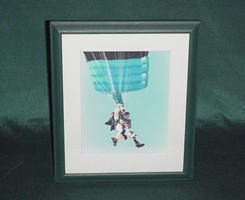
Parachuting on the Great Barrier Reef.
This frame is an ash moulding which has been painted with matt emulsion paint and then finished with wax to seal the paint. This is an excellent way to create your own finishes to wood frames and if you are any good at decorating, the choices of colour and finish are endless. This colour doesn't really match the picture but it does match my bathroom! This was a truly awesome experience parachuting whilst in Australia on the Barrier Reef. Again highly recommended but not as leisurely an experience as the eclipse!
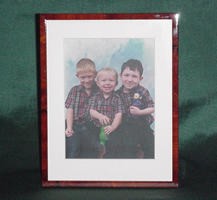
My three Nephews
This is a veneer moulding that looks very smart when finished and has a very glossy finish to it. I always think these types of mouldings would look good on a grand piano. I don't have such a thing but I just imagine it would. The types of pictures that I think look good in this kind of frame are photographs, such as this one of my three nephews.
Needlework and Canvas
Useful Tips for Stretching Oils on Canvas
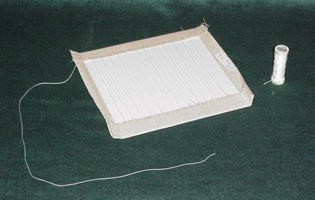
Lacing the needlework
- Oils are usually painted to fit standard stretcher bars. These are available to buy at most art shops.
- If the size is non-standard, you can make your own stretcher frame from 2” X 3/4” baton available from most D.I.Y. shops.
- Ensure that the frame is truly square, by first measuring both dimensions and then checking that the diagonal dimensions are identical.
- Use a staple gun to position the canvas.
- Do not over stretch the canvas, it may tear.
- Use ‘hospital corners’ at the corners of the canvas.
- Make sure that the triangle corner pieces are in the correct slots provided,NOT between the canvas and the stretcher bar.
- Put the bottom corner in first.
- Make sure that the picture frame is made, with enough allowance so that the oil fits easily, so that you do not have to force it.
Exert from book Frames and Framing by Andy Parks
Conservation of your works of art is especially important for all picture framing. Therefore it is recommended that you choose a piece of higher quality mount board to stretch your needlework over. Higher quality mount board are termed as ‘acid free’ or ‘neutral Ph’. They will cost more but the lower levels of acid present in the board will help to preserve your works of art. Also be aware that the colour of the board may show through the material so choose a colour of board that matches the colour that the needlework is sewn onto.
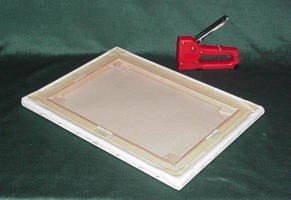
How the canvas should look when properly stretched
Contact Details
- Contact
- Opening Times
- How To Find Us
Contact Us
Unit 4A
Buriton Business Park
Petersfield
Hampshire GU32 3NJ
United Kingdom
Phone: +44 (0)1730 269926
Opening Times

Mornings
The Petersfield Framing Studios are open by appointment only. Appointments are usually available Monday to Friday from 9am until 1pm. After making an appointment you can come to the workshop to choose your picture mounts and frames or collect orders that are ready.
Afternoons
Afternoons are dedicated to collection and delivery of picture framing at your home by appointment.
Directions to the Petersfield Framing Studios
From Petersfield:
We are located about one mile due South of Petersfield town centre on the Buriton Business Park. Take the old A3 heading towards Portsmouth out of Petersfield, pass Tesco's and The Petersfield School, both on the right hand side. Keep travelling up The Causeway until the roundabout by the old Jolly Sailor public house. Keep going on the old A3 towards Portsmouth from a 30 mph limit into a 40 mph limit and then into a 60 mph limit. Go past a lay by on the left hand side and past another smaller lay by on the right hand side of the road. We are on the next right hand turn. It is difficult to see but look for a red triangle warning sign of a low bridge just after this turning on the right. Turn right here and follow this narrow road for about 50 yards until you see another turning on the right where you will see a small business park in front of you. Turn right here and then immediately left into the entrance of the Buriton Business Park. We are in the building on the left hand side. Park your car somewhere on the left hand side. We are located at the very end of the left hand building in Unit 4A.
Travelling from the North of Petersfield via the A3:
The exit that you need is the last exit from the A3 before driving past Butser Hill and before the turning off for the Queen Elizabeth Country Park. Travel along the A3 past the two junctions signposted "Midhurst A272" and also past the junction signposted "Winchester A272" respectively. This is also the junction where the service station is located. Keep driving along the A3 past the industrial estate on the left hand side. Eventually you will see Butser Hill with the easily identifiable mast on top on the right hand side. As you near the hill, there is another junction off the A3 signposted "Buriton". Take this junction and follow the road around to the left heading back on itself. Follow this road for about 200 yards until you arrive at a roundabout. Go straight over this roundabout signposted towards "Petersfield" and cross over a bridge over the railway. Follow this road for about 200 yards where you will see a sign on the edge of the road that says Buriton Business Park. Take the next left hand turn that has a warning sign of a low bridge as a land mark. Follow this road for about 50 yards and then turn left and the Buriton Business Park entrance is just on the left hand side. We are in the building on the left hand side. Park your car somewhere on the left hand side. We are located at the very end of the corridor in the left hand building in Unit 4A.
Travelling from the South of Petersfield via the A3:
Follow the A3 over the South Downs until the A3(M) becomes the A3. Keep going past the Queen Elizabeth County Park on the right and past Butser Hill on the left. Once you have passed Butser Hill and you can no longer see the mast on top of the hill, we are off of the next junction, signposted "Buriton". Take this junction and follow the road around to the right back under the A3 and you will arrive at a roundabout. Turn left here where it is signposted for "Petersfield" and cross over a bridge over the railway. Follow this road for about 200 yards where you will see a sign on the edge of the road that says Buriton Business Park. Take the next left hand turn that has a warning sign of a low bridge as a land mark. Follow this road for about 50 yards and then turn left and the Buriton Business Park entrance is just on the left hand side. We are in the building on the left hand side. Park your car somewhere on the left hand side. We are located at the very end of the corridor in the left hand building in Unit 4A.