
Frame Cutting and Assembly
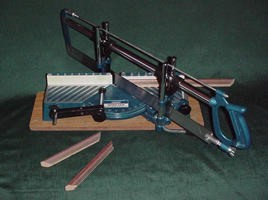
This page provides a summary of how best to use the mitre saw and the mitre vices that I recommend to cut and assemble your frames. The mitre vices can be purchased through this website. Please visit our Shop for further details. The mitre saw used for cutting the frames can be bought at various DIY stores but do send me details of the saw before you buy it as I can advise of the best one to purchase. I also have some very good instructions that I have written for the mitre saw that are available with some of the combination kits.
Useful Tips for Frame Cutting
The mitre saw that is the most cost-effective model. Instructions are available for this model but we do not sell this saw due to the weight of the saw for delivery.
- If buying your own mitre saw, buy the black one NOT the blue one as it has a better clamping system
- A 24 teeth per inch (T.P.I.) blade is recommended as it gives the best cut. Such a blade will cost app. £8.00
- Always allow 1/8” extra length when cutting frames, e.g. if the mount measures 12” X 10” then cut the frame 12 1/8” X 10 1/8”
- Cut all the angles one way first then turn the saw round for the opposite angle
- Cut the long side first, then if any mistakes occur this can then be used for the short side.
- Be careful with the first few strokes of the saw blade so as not to splinter the top edge of the material.
- Don’t let the saw drop onto the top of the moulding
- Make sure the saw will stop before it cuts into the aluminium casting.
- Do not crush the rebate of the moulding with the clamps.
- Measure it twice - cut it once
- Mind your fingers!
Exert from book Frames and Framing by Andy Parks
You will create a lot of saw dust and it will probably hinder the view of the etched line on the mitre saw base. Do not blow this dust as it will invariably go in your eyes. The best idea is to keep the saw dust in a small pot or box and use it as a filler in combination with wood glue.
Useful Tips for Mitre Assembly
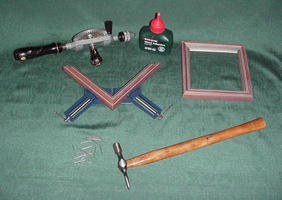
The mitre vice for sale through my classes and the shop
- Use white P.V.A or resin ‘W’ glue
- Use 19 gauge panel pins
- Drilling the holes first will make assembly of the frame easier
- Drill the pilot holes with the same gauge panel pin to be used in assembly. Do not use a drill bit for this
- Protect the moulding in the mitre vice with scraps of mountboard.
- Always join one short length to one long length.
- Make sure each pair of long and short lengths are of the opposite hand, e.g. long length, right hand - short length, left hand.
- Cut heads of nails off with pincers if they are too big and will look unsightly
- Leave the mitre in the vice overnight, once nailed, to allow the glue to dry thoroughly
Exert from book Frames and Framing by Andy Parks
It is recommended that you only use a water based wood adhesive glue, such as PVA or white wood glue. Do not use such glues as instant contact glues or strong industrial spirit based glues. This is because it is quite difficult to perfectly align two pieces of moulding in the mitre vices and you may need to make slight adjustments to ensure a perfectly aligned corner. Also the glue often spills over onto the top of the frame. In fact this seepage is highly desirable to ensure plenty of glue. Any spirit glue may take the surface off your moulding so only use wood glues that are water based.