
Mount Cutting Multiple Aperture Mounts
This page provides a summary of how best to use the mount cutter that I recommend. It also forms a summary of the instructions that I have written to go with the mount cutter. The instructions for the mount cutter are made up of 12 pages of A4 and utilise a step-by-step approach. There are also useful diagrams throughout so guide you along the way. The mount cutter used here is a Jakar mount cutter and can be purchased through this website. Please visit our Shop for further details.
Useful Tips for Mount Cutting
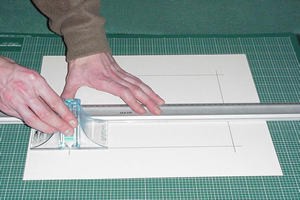
Make sure the mount cutter is this way round
- Make sure that the mount cutter runs up and down the straight edge groove smoothly.
- Check that the blade is sharp.
- Always mark out and cut the mounts from the back of the mountboard.
- Think about it three times, measure it twice and cut it once.
- Ensure that the bevel is going to be the right way.
- Cut the mount on the top of a scrap mountboard or cutting mat.
- Mind your fingers !
- Always use a razor blade to finish any under cutting that may be needed.
- Mind your fingers !
- Never push the middle of the mount out because it will tear the board.
- If at first, you don’t succeed ......!
Exert from book Frames and Framing by Andy Parks
Do not cut deeper as you cut. Once at the stop point, keep the blade at the same depth as you had to begin with and then slide the mount cutter back to the start point. Move the blade slightly deeper. Then repeat the stages as above.
Useful Tips for Multi Aperture Mounts
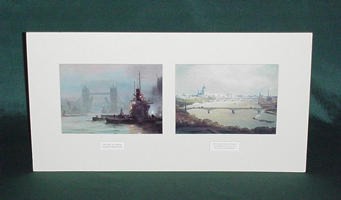
A Multi Aperature Mount
- Always draw a rough sketch with all dimensions shown
- If you make the border between the apertures smaller that the outside borders,this will look easier on the eye.
- Measure these points carefully and check your addition to avoid mistakes
- Draw the mount on the back of the board as usual
- Circle the points of intersection on the mounts, with a pencil, to make the shape clearer from the other lines.
- Make sure you have the mount cutter pointing the right way before cutting each line.
- Cut one hole at a time and remove the middle with a razor blade.
- For single mounts with one aperture, always have a greater width of mount at the base.
Exert from book Frames and Framing by Andy Parks
When measuring your multiple aperture mounts the bars between the pictures tend to look better if they are a lot narrower than the outer borders of the mount. A good measurement is to use ¾” – 1” or 20mm to 25mm for the bars between pictures. Any wider than this and the pictures can appear to be unrelated to each other.